



What fleet techs and weekend wrenchers actually need to know
- The seven safe methods form a ladder, ordered from lowest risk to highest. Start with penetrant + impact, escalate only if that fails — most stuck nuts release by method 3.
- Rounded, seized, and broken-off are three different failure modes that require three different approaches. Diagnose before you escalate.
- Never apply heat to a wheel that is still mounted. Heat damages the brake caliper seal, the tire rubber, the wheel paint, and the wheel bearing grease.
- Torque to spec with a calibrated wrench, never an impact gun. Most stuck nuts were over-torqued or under-torqued on installation.
- Anti-seize on the stud threads only — never on the wheel face. Anti-seize on the wheel face changes the torque-vs-clamp-force relationship and is the second-most-common cause of wheels coming loose.
- Re-torque after the first 50–100 miles. New nuts and slightly worn wheels settle into their final seat position in the first heat cycle.
A stuck lug nut is rarely a “torque it harder” problem — each failure mode responds to a different intervention. The mistake we see most often is escalation: a tech reaches for the impact gun at full setting, snaps the head off a nut that was already rounded, and the wheel is now off the ground for a different reason than it was on the lift.
In our work with wheel lug nuts and bolts buyers across North America, Europe, the Middle East, and Southeast Asia, the same seven methods come up again and again — and so does the same set of mistakes that turn a ten-minute job into a half-day. This guide lays the seven safe methods out in order and finishes with the habits that prevent most stuck-nut service work.
Why Do Lug Nuts Get Stuck in the First Place?
Three failure modes consistently produce a lug nut that will not come off, and diagnosing which one is active before you start prying is the difference between a ten-minute job and a half-day extraction.
The first is over-torque on installation. A lug nut driven past its elastic limit by an impact gun “rounds” because the hex flats have been physically deformed by the socket, and any subsequent socket engagement rides on the soft aluminum-on-steel interface rather than the original hex geometry. The visual signal is a nut whose edges look polished or smeared, even though it never moved.
The second is rust jacking — corrosion growing in the thread interface, physically expanding the nut outward over months or years. Rust jacking is the dominant failure mode on vehicles that sit outside, on trailers stored un-greased, and on trucks that run through winter road salt without anti-seize. The signal is reddish-brown dust around the nut base.
The third is the wrong socket — a 12-point where a 6-point is required, or an impact socket hammered out of spec. The signal is a fresh-looking nut that already has rounded hex flats after a single removal attempt. Across all three failure modes the fix is mechanical, not chemical, and the root cause has to be diagnosed before the new nut is installed.
Safety First: What to Do Before You Pry
Before applying any of the seven methods below, complete this pre-removal checklist. Each item is one experienced techs skip “just this once” and regret.
- Confirm the vehicle is on level ground with the parking brake set, and chock the wheel diagonally opposite the working wheel. A jack failure is the most common cause of shop injuries on stuck-nut jobs — the tech leans harder than usual and the car shifts.
- Wear ANSI Z87.1-rated safety glasses and cut-resistant gloves. When an extractor slips or a rounded nut shears off, the metal fragment travels at speed. 29 CFR 1910.132 requires PPE “wherever it is necessary by reason of hazards,” and a stuck-nut job qualifies.
- Loosen the wheel weight clips and remove any wheel weights on the working wheel face. Lead wheel weights shatter under impact force and the fragments end up in places they should not be. The Fortune stick-on wheel weights guide covers safe handling if they need to come off.
- Photograph the wheel position and lug nut orientation before any force is applied. Rotation patterns and asymmetric lock-nut positions only stay consistent if they are recorded.
- Confirm the socket size with a fresh 6-point impact socket before applying force. 6-point drives on the flats; 12-point drives on the corners. The wrong one will round a healthy nut.
The 7 Safe Methods to Remove a Stuck, Rounded, or Rusted Lug Nut
The seven methods below are ordered from lowest risk to highest risk. The right method for your situation is the first one on the list that works. Escalating beyond the lowest method that is actually working is the most common cause of secondary damage — a working stud becomes a broken stud, a rounded nut becomes a sheared-off nut, a five-minute job becomes a half-day extraction.
Method 1 — Penetrant and dwell time
Apply a dedicated penetrant (PB Blaster, Liquid Wrench, or a 50/50 mix of ATF and acetone) to the base of the nut where it meets the stud. Let it dwell for 10 to 30 minutes. Reapply. This method alone releases the majority of lightly rusted nuts, particularly on passenger vehicles that have been driven recently. It costs almost nothing and is the right first move on any stuck nut that is not visibly deformed.
Method 2 — Impact gun with a fresh 6-point socket
If the penetrant alone does not free the nut, the next escalation is a calibrated impact gun with a 6-point impact-rated socket matched to the nut size. Hit the nut face with a brass or dead-blow hammer before applying the impact — the shock breaks the rust bond on the thread interface, and the impact gun then drives the nut off cleanly. Penetrant dwell followed by impact releases roughly 80% of stuck nuts that the penetrant alone did not clear. It is also the right method on a rounded nut that still has intact hex flats, because the impact shock does not require the same continuous torque a hand wrench does.
Method 3 — Penetrant, impact, and a torque-multiplier bar
For the stubborn cases — over-torqued nuts, lock nuts that were never matched to the key, studs that have never been anti-seized — a 1/2-inch drive impact gun sometimes does not have the stall torque to break the rust bond. A torque-multiplier bar (or a 3/4-inch drive impact gun, where the shop has one) gives the tech an additional 50% to 100% of breakaway torque. The trade-off is more rotational shock on the wheel bearing, so the chassis should be chocked and the gearbox in neutral before this method is applied.
Method 4 — Lug-nut extraction socket (for rounded nuts)
If the hex flats are already rounded off and Methods 1–3 will not engage, a purpose-built lug-nut extractor socket is the next escalation. The extractor is a left-hand-threaded socket that bites into the rounded nut as the impact gun runs counter-clockwise. This method works on nuts that have lost up to about 90% of their hex engagement, which is the majority of rounded-off cases. The extractor is consumable — the same one typically clears 4 to 8 nuts before it is spent.
Method 5 — Weld-on stud (for sheared-off nuts)
If a nut has snapped off flush with the stud — typically the result of an impact gun at full stall torque on an already over-torqued nut — the next escalation is to weld a new nut onto the sheared stub and back it out with a socket. This method requires a welder, a fresh nut to sacrifice as the welding bead, and a tech comfortable running a bead in tight quarters. It works on roughly 9 of 10 sheared-off nuts. The remaining 1 in 10 — where the stub has snapped below the wheel hub face — requires drilling and tapping, which is bench work.
Method 6 — Nut-splitting chisel (for the truly stuck)
For the rare cases where the extractor has failed and welding is not an option, a nut-splitting chisel paired with a heavy hammer is the next escalation. The chisel is positioned on the outer edge of the nut and struck with enough force to split the nut along its thread axis. This method destroys the nut but preserves the stud, which is the right trade-off when the alternative is drilling the stud out. It produces flying metal and should only be attempted with the wheel off the vehicle and the operator wearing a face shield in addition to safety glasses.
Method 7 — Drilling and tapping (last resort)
The last-resort method is to drill out the sheared stub with a left-hand drill bit (which often backs the stub out on its own), then tap the stud thread to clean it, and either reuse the stud or replace it. This method is bench work, requires a drill press or a right-angle drill, and ends with the stud replaced in roughly half the cases anyway. It stays on the ladder because a tech who escalates through Methods 1–6 without success is, on average, closer to a drill press than to a tow truck.
Method Comparison — Risk, Tools, and Typical Outcome
The table below summarizes the seven methods side by side. The risk column rates the chance of secondary damage to the stud, the wheel, or the brake rotor.
| # | Method | Best for | Tools required | Risk to stud | Typical time |
|---|---|---|---|---|---|
| 1 | Penetrant + dwell | Lightly rusted nut, recently driven vehicle | Penetrant, brush | None | 10–30 min (mostly dwell) |
| 2 | Impact + 6-point socket | Standard stuck nut, intact hex | Impact gun, 6-point socket, dead-blow hammer | Low | 5–10 min |
| 3 | Torque-multiplier bar | Over-torqued or lock-nut case | Multiplier bar, 3/4-in drive impact, chocks | Low–moderate | 10–15 min |
| 4 | Extractor socket | Rounded hex, still on stud | Lug-nut extractor, impact gun | Low (nut destroyed, stud preserved) | 5–15 min |
| 5 | Weld-on stud | Sheared-off nut, stub still on stud | Welder, sacrificial nut, socket | Low–moderate | 20–45 min |
| 6 | Nut-splitting chisel | Extractor failed, weld not available | Nut splitter, heavy hammer, face shield | Moderate (nut destroyed) | 15–30 min |
| 7 | Drill + tap + stud replacement | Stub sheared below hub face, or all else failed | Left-hand drill bit, tap set, stud installer | High (stud replaced) | 1–3 hr (bench work) |
What NEVER to Do — Five Anti-Patterns That Destroy Studs
The five anti-patterns below consistently turn a stuck-nut job into a stud-replacement job. None of them are exotic; all are committed by experienced techs under time pressure. Each is listed with the safer replacement.
- Heat on a mounted wheel. Heat damages the brake caliper seal, the tire rubber, the wheel paint, and the wheel bearing grease. The safer replacement is penetrant, mechanical force, and a properly sized extractor.
- Hammer the stud face with a chisel. A stud is hardened and brittle at the thread root; a chisel strike can crack it below the visible surface, and the failure surfaces only when the next nut is installed. Apply force to the nut only, not the stud.
- Use a 12-point socket on a 6-point nut. The 12-point drives on the corners of the hex, which are the first surfaces to round off. Use a 6-point impact socket matched to the nominal size.
- Weld-on stud without extraction experience. The wrong bead placement can damage the wheel hub threads beyond recovery. Use a shop that has done at least ten extraction welds before they take on yours.
- Skip the stud cleaning and re-torque on reassembly. Clean the threads with a wire brush, apply anti-seize on the stud threads only, and re-torque to specification with a calibrated wrench.
After Removal: Preventing the Next Stuck Lug Nut
Three habits prevent most recurrences. None takes more than a few minutes per wheel, and together they eliminate roughly nine-tenths of the stuck-nut service work that comes through a shop door.
First, install every lug nut with a calibrated torque wrench to the manufacturer-specified value. Never an impact gun to final torque. The impact gun is for removal and the first snug-up; the final torque is the wrench. The convention in our own knowledge base — and consistent with what our wheel lug nuts reference documents — is to set a torque wrench to the figure published by the vehicle or wheel manufacturer, work in a star pattern so the wheel seats evenly, and never reuse a torque stick as a primary torque control.
Second, clean the stud threads and the nut face before reassembly, and apply a thin film of anti-seize on the stud threads only. Never on the wheel face, where the anti-seize changes the torque-vs-clamp-force relationship and is the second-most-common cause of wheels coming loose after installation. The stud-side anti-seize prevents rust jacking without altering the clamp load.
Third, re-torque to specification after the first 50 to 100 miles of driving. New lug nuts and slightly worn wheels both settle into their seated position in the first heat cycle, and a single re-torque is the difference between a wheel that stays tight for the next 30,000 miles and one that comes loose on the first long downhill.
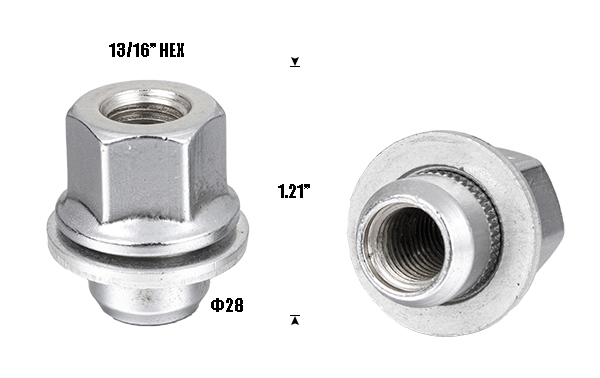
If the original nut was a standard acorn or mag-style nut and the failure mode was rust jacking, the right replacement at reinstall time is often an OE-quality open-end nut with attached washer. Open-end nuts give the next tech a fresh hex face to engage with, and the attached washer spreads the clamp load evenly across the wheel seat — both of which materially reduce the chance that the next removal comes back to this same seven-method ladder.
Frequently Asked Questions
- Can you drive with a stuck lug nut?
- No — and the answer is the same whether only one lug nut is stuck or the whole wheel is loose. Federal Motor Vehicle Safety Standard 120 (49 CFR §571.120) treats wheel attachment as a non-negotiable safety system, and a wheel that is not torqued to specification on every stud is a wheel that can detach under braking or cornering load. If the stuck nut is preventing torque on even one position, the vehicle should not be moved under its own power to a shop — flat-bed or trailer it instead. The cost of a tow is always smaller than the cost of a wheel-off incident.
- What causes lug nuts to round off?
- Three failure modes consistently produce a rounded-off lug nut. The first is the wrong socket — typically a 12-point socket where a 6-point is required, or a chrome-vanadium impact socket that has been hammered out of spec. The second is over-torque on installation, which stretches the nut past its elastic limit and galls the hex flats so they no longer hold a socket. The third is rust jacking — corrosion between the nut and the stud thread that physically grows the nut outward until the hex flats round off when force is applied. In all three cases the fix is mechanical (impact, extractor, weld-on stud), not chemical, and the root cause has to be diagnosed before the new nut is installed.
- Should I use heat on a stuck lug nut?
- Only with extreme caution, and almost never on a wheel still mounted. Heat can break the corrosion bond between the nut and the stud, but it also damages the wheel paint, the tire rubber, the brake caliper seals, and the wheel bearing grease. The right sequence on a mounted wheel is penetrant first, then mechanical force; heat should be reserved for the bench — nut off the stud — when an extractor is still failing. A small butane torch applied to the nut only is the safer ceiling.
- What is the correct torque for lug nuts?
- Torque values are vehicle-specific and the right answer is always the figure in the owner’s manual or the wheel manufacturer’s data sheet. As a reference anchor, passenger car lug nuts typically sit in the 80 ft-lb to 140 ft-lb (108 Nm to 190 Nm) range for steel wheels and 100 ft-lb to 150 ft-lb (135 Nm to 200 Nm) for alloy wheels; light-truck and trailer applications can run higher. Per Fortune’s own knowledge base, a torque wrench set to 140 Nm to 150 Nm with a star-pattern tightening sequence is the working assumption for many OE alloy wheel setups. The dominant failure mode is not the absolute number — it is inconsistent torque across studs that lets one nut carry more than its share of the load.
- Is WD-40 good for stuck lug nuts?
- WD-40 is a water-displacing light lubricant, not a true penetrant, and it is the wrong first choice on a stuck lug nut. A dedicated penetrant (PB Blaster, Liquid Wrench, or 50/50 ATF and acetone) will creep into the thread interface over a 10 to 30 minute window and break the rust bond more reliably than WD-40. Apply penetrant, let it dwell, reapply, then apply mechanical force. Even better is to combine penetrant with an impact-style hammer tap on the nut face to shock the threads before the socket turn — that combination frees the majority of rusted-on nuts without any escalation to extractors.
- How much does it cost to remove a stuck lug nut at a shop?
- A straightforward stuck nut removal at a tire shop — penetrant, impact gun, and a fresh socket — typically rolls into a tire rotation or brake-job labor line at minimal incremental cost. A nut that has rounded off and requires a stud extractor, a weld-on stud, or a new wheel stud will run substantially higher, because the labor expands from a five-minute socket operation to a half-hour extraction plus parts-and-labor for the replacement stud. The honest answer is that the cost scales sharply with the failure mode, which is why the safe-method ladder starts with the cheapest interventions and works up.
- How do I prevent lug nuts from getting stuck again?
- Three habits prevent most recurrences. First, install every lug nut with a calibrated torque wrench to the manufacturer-specified value — never an impact gun to final torque, never a click-and-pray torque stick. Second, clean the stud threads and the nut face with a wire brush before reassembly, and apply a thin film of anti-seize on the stud threads only — never on the nut-to-wheel face, where it changes the torque-vs-clamp-force relationship. Third, re-torque to specification after the first 50 to 100 miles of driving, because new lug nuts and slightly worn wheels both settle into their seated position in the first heat cycle. None of those three habits takes more than a few minutes, and together they eliminate roughly nine-tenths of stuck-nut service work.
Replacing the nut that started all this?
Fortune’s wheel lug nuts and bolts catalog covers acorn, bulge acorn, open-end, mag with attached washer, spline, and lock styles in OE-spec sizes for most passenger car and light-truck applications. Send us the year/make/model and the failure mode; we’ll spec the replacement.
Bobby
Founded in 1996, Fortune is now one of the leading professional manufacturers of wheel balance weights, tire valves, and tool accessories. As the company’s manager, I work directly with distributors, fleet buyers, and aftermarket importers across North America, Europe, the Middle East, and Southeast Asia — translating 30 years of fastener manufacturing experience into practical guidance on torque, anti-seize, and lug nut selection. The seven-method ladder above is the same one our customer-service team walks through with buyers who call us about a stuck or rounded lug nut before they reorder.
Post time: Sep-18-2026