



FORTUNE · TIRE VALVE SERVICE TOOLS
Why Fortune Developed a Smarter Tire Valve Installation Tool Kit
A practical approach to controlled snap-in valve removal and external installation without removing the tire from the wheel.
Replacing a rubber snap-in tire valve often involves more work than the size of the component suggests. Conventional service methods may require cutting or forcefully pulling out the existing valve, breaking the tire bead, or removing the tire from the wheel before installing a new valve.
Fortune developed this tire valve installation tool kit to simplify that workflow. Its purpose is not limited to faster installation. The kit is designed to make valve removal more controlled, reduce unnecessary damage during handling, and allow a compatible new snap-in valve to be installed without removing the tire from the wheel.
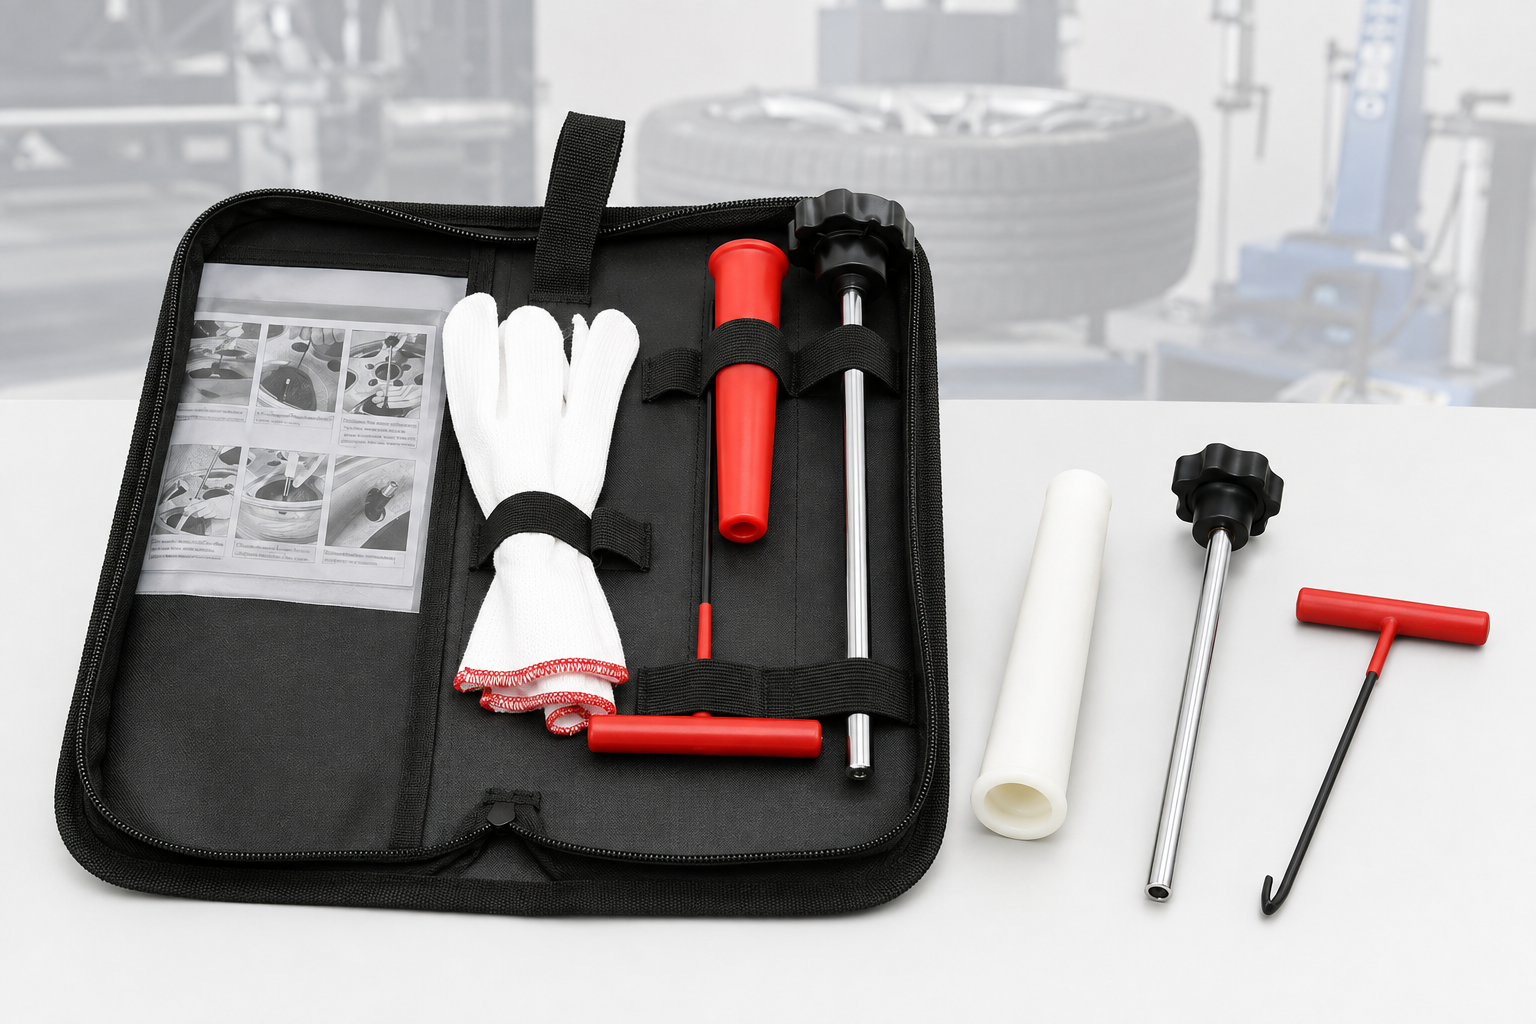
Fortune tire valve installation tool kit with T-shaped hook, tapered positioning tube, metal push rod, gloves, instructions and storage case.
Why Conventional Valve Service Can Be Inconvenient
Rubber snap-in valves are widely used in tubeless tire and wheel assemblies. Although the valve is a relatively small component, its base is positioned inside the wheel. This can make removal and installation more complicated than expected.
Depending on the service method, technicians may need to deflate the tire, break the bead, move or remove the tire from the wheel, cut or pull out the old valve, and then install a replacement from inside the assembly.
| Service Challenge | Practical Effect |
|---|---|
| Cutting the existing valve | The removed valve cannot remain intact for inspection or failure analysis. |
| Breaking the tire bead | More equipment, handling and operating steps may be required. |
| Removing the tire | A focused valve-service task becomes a broader tire-service operation. |
| Using improvised tools | Control may be reduced, increasing the possibility of valve or wheel damage. |
PRODUCT DEVELOPMENT PURPOSE
Create a compact tool system that supports controlled valve removal and external installation while reducing unnecessary tire disassembly and equipment dependence.
A More Controlled Way to Remove the Existing Valve
Many conventional removal methods assume that the old valve will be discarded. The rubber body may be cut, clamped or forcefully pulled through the wheel hole. Although these methods can remove the valve, they may destroy evidence of cracking, deformation, aging or installation damage.
The Fortune tool kit uses a dedicated T-shaped hook to engage the base of the snap-in valve. When the tool is used correctly, the valve can be pulled through the wheel hole without unnecessary cutting or tearing.
Keeping the removed valve intact can support visual inspection, product comparison, technical training and analysis of possible leakage causes.
Preserving a valve during removal does not automatically authorize its reuse.
Removed snap-in valves should be inspected and handled according to the applicable tire, valve, wheel and industry guidance. Where replacement is required, the removed valve should not be returned to service.
Installing a New Valve Without Removing the Tire
The second objective of the product was to simplify installation. Instead of accessing the valve hole from inside the wheel, the kit uses a tapered positioning tube and metal push rod to guide a compatible rubber snap-in valve into place from the outside.
The tapered tube aligns the installation path with the wheel’s valve hole. It also guides the rubber valve as the push rod moves it into position. This makes it possible to complete the installation while the tire remains mounted on the wheel.
| Kit Component | Primary Function |
|---|---|
| T-Shaped Hook | Engages the base of the existing snap-in valve for controlled removal. |
| Tapered Positioning Tube | Aligns the new valve with the wheel hole and guides it during installation. |
| Metal Push Rod | Pushes the compatible new valve through the positioning tube and into place. |
| Gloves, Instructions and Case | Support handling, operating guidance, storage and portability. |
Why Service Convenience Matters
Convenience in professional service equipment is not simply about completing a task faster. A purpose-built tool can reduce unnecessary handling, make the procedure easier to understand and improve control at each stage.
| 1 | Reduce unnecessary valve damage. The dedicated hook provides an alternative to immediately cutting or tearing the existing valve. |
| 2 | Avoid unnecessary tire removal. A compatible new snap-in valve can be installed from outside the wheel through the tapered guide. |
| 3 | Reduce equipment dependence. The compact manual kit can support focused valve service where a tire changer is unavailable or unnecessary. |
| 4 | Create a controlled workflow. Separate tools for removal, alignment and installation reduce reliance on improvised methods. |
These characteristics can be useful for tire-service shops, fleet maintenance, mobile service and equipment maintenance locations where portability and process efficiency are important.
A Practical Operating Workflow
The exact procedure should always follow the instructions supplied with the tool and valve. The image below summarizes the three main operating stages.
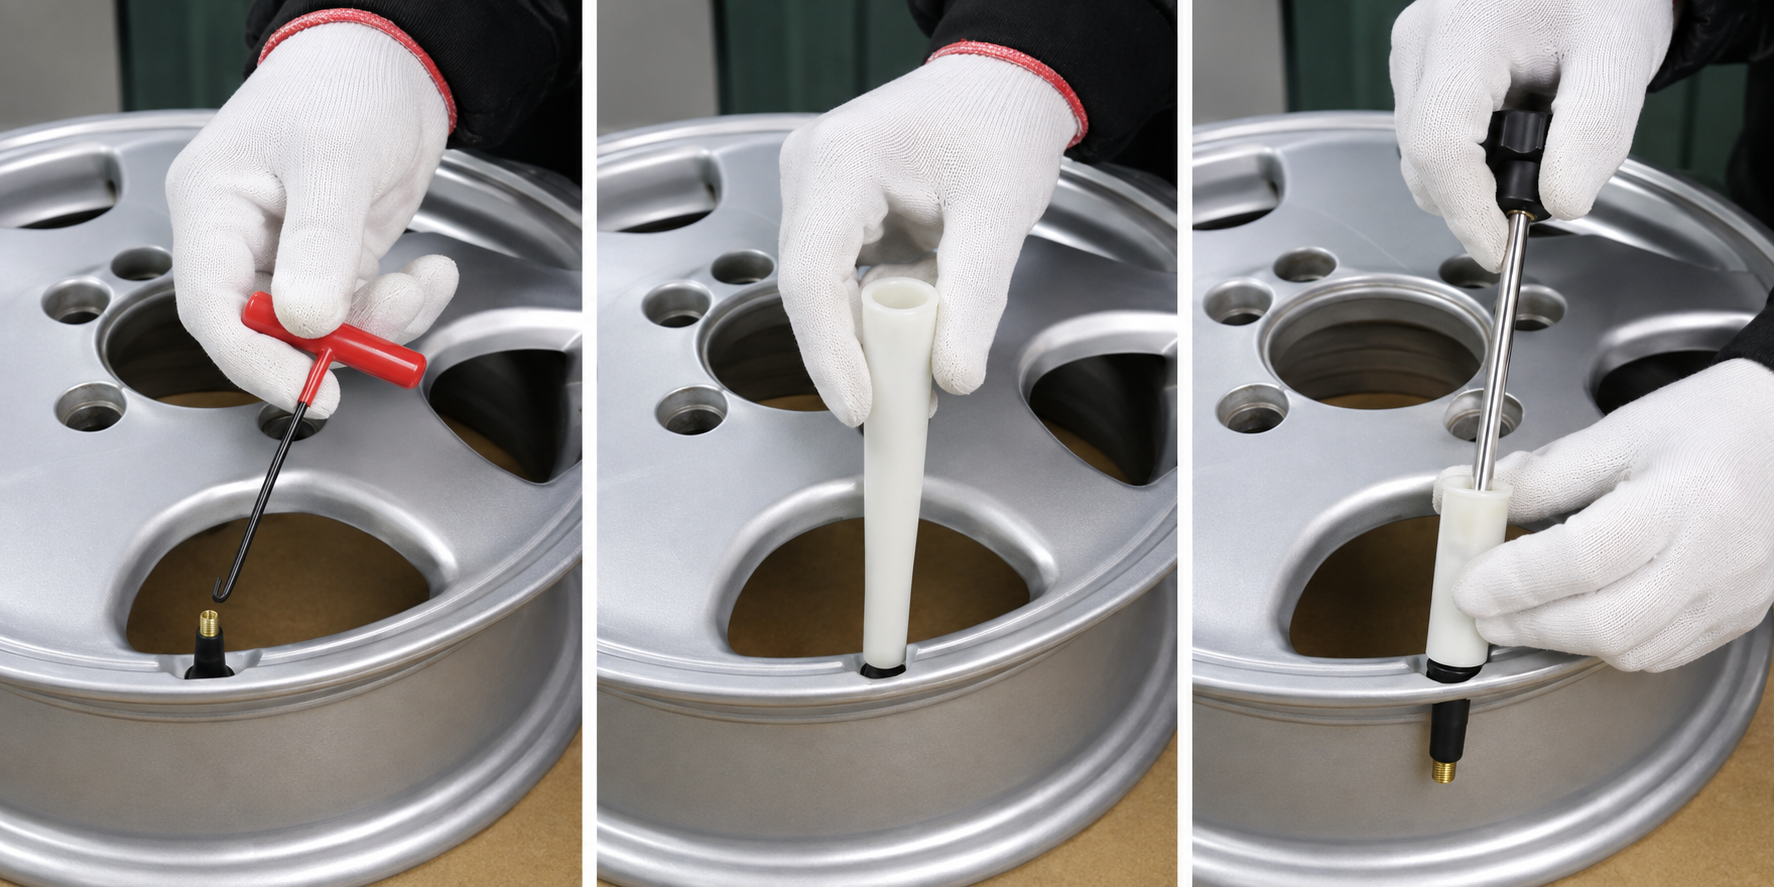
| Controlled Removal Engage the valve base with the T-shaped hook. |
Accurate Positioning Align the tapered tube with the valve hole. |
External Installation Guide the new valve into position with the push rod. |
| 1 | Deflate completely. Confirm that all tire pressure has been released before beginning. |
| 2 | Insert the hook. Position the T-shaped hook between the wheel and the existing snap-in valve. |
| 3 | Engage the valve. Rotate the hook until it engages the base of the valve. |
| 4 | Remove carefully. Pull the valve through the wheel hole using a controlled motion. |
| 5 | Prepare the new valve. Place a compatible rubber snap-in valve on the metal push rod. |
| 6 | Apply suitable lubricant. Use a tire-and-rubber-compatible lubricant where required by the operating instructions. |
| 7 | Align the positioning tube. Place the tapered tube directly over the wheel’s valve hole. |
| 8 | Push the valve into position. Move the push rod straight through the tapered guide until the valve is installed. |
| 9 | Inspect and verify. Confirm correct seating, inflate according to the applicable specifications and perform a leak check. |
Important Application Limits
The tool kit is intended for compatible standard rubber snap-in tire valves. It should not be used as a universal solution for every valve or wheel assembly.
- Do not use the kit on TPMS valve assemblies.
- Do not use it on metal clamp-in valves.
- Completely deflate the tire before removing or installing a valve.
- Verify that the replacement valve is compatible with the wheel and application.
- Use only a suitable tire-and-rubber-compatible lubricant.
- Inspect the wheel, valve hole and surrounding area for damage or corrosion.
- Follow the applicable tire, wheel, valve, vehicle and tool instructions.
This tool simplifies compatible snap-in valve service, but it does not replace tire removal when internal inspection, tire repair, wheel repair or other service procedures require the tire to be demounted.
Frequently Asked Questions
Does the tire need to be removed from the wheel?
No. For a compatible standard rubber snap-in valve, the tool is designed to support removal and installation while the tire remains mounted on the wheel. The tire must still be completely deflated before service.
Does the tool avoid damaging the removed valve?
The dedicated hook is designed to reduce unnecessary cutting and tearing, helping keep the removed valve intact for inspection. Whether a valve may remain in service is a separate decision governed by its condition and the applicable manufacturer and industry guidance.
Can the kit be used on TPMS valves?
No. The kit is intended for compatible standard rubber snap-in valves and should not be used on TPMS valve assemblies or metal clamp-in valves.
What lubricant should be used?
Use a lubricant specifically suitable for tire and rubber service, following the tool and valve instructions. Do not substitute an unapproved petroleum-, solvent- or silicone-based product.
Conclusion
The Fortune tire valve installation tool kit was developed to improve a small but often inconvenient maintenance task. Its T-shaped hook supports more controlled removal, while the tapered positioning tube and metal push rod allow a compatible new valve to be installed without removing the tire from the wheel.
By reducing unnecessary valve damage, avoiding unnecessary tire removal and lowering dependence on larger service equipment, the kit provides a practical solution for workshops, fleets and mobile-service professionals.
The product reflects a straightforward development principle: routine tire-valve service should be as controlled, convenient and efficient as the application allows.
Post time: Aug-13-2026